In this article, you’ll learn about Spring Cloud Eureka Service Discovery implementation and Client Side Load balancing with Spring Ribbon
Introduction to Service Discovery
Service Discovery is about a concept called passive service discovery. So, what I am going to do is explain a little bit about what a passive Service Discovery is and then I am going to give you the specifics about how to build and run your own spring cloud Eureka server how to build and run a client that uses the server.
Why we need Service Discovery
- I will explain you with a real-time example of What a Service Discovery is all about? Imagine a chat client. If you have ever signed into a chat client. So, in this case think about what exactly happens here. When you come into the chat client, then you are instantly greeted with a listing of all of your friends who are online that point of time. And if you think about their perspective, they can see you suddenly pop into the list along with everyone else.
- So, what is exactly happening here is a two-way transaction of information. The client comes in and register itself with the server and the server knows about you. Then the server provides you with a list of all the other known clients. So, this is basically with Service Discovery is all about. Here, you as a client has discovered the other clients in exchange for the act of registering. And the other side of that is client has itself been discovered by other clients.
- So, to summarize that, when you sign into a chat client , what happens?
- Client registers itself with the server – Server knows that you are online now
- The server provides you with a list of other known clients ( your contacts who are online)
- So, here you, the client has discovered the other clients and also you are discovered by other clients. When we use Microservices, we typically have a large number of services that need to be interrelated and they need to call each other. This is really very challenging to configure.
- How can one application easily find all of the other run-time dependencies while you could configure this manually even using spring cloud config Server. But this is a lengthy process and manual configuration process.
- So, what service discovery does here, it provides a single lookup service that is self-maintaining because the client registers themselves and, in the process, they discover the other registrants. So, for the service discovery,there are several solutions right now such as “Eureka from Netflix”, “Consul”, “Zookeeper” etc.
So, I am going to explain here on Eureka for Service Discovery.
Anatomy of Eureka Service Discovery
- Eureka comes from Netflix. Eureka provides a “lookup server”. This lookup server is going to be a registration of all of the clients that check-in.
- Generally, there will be multiple Eureka servers running so that to make it highly available. This is actually running multiple instances that intercommunicate with each other and what they do is they copy the replicate state of the registered services between them.
- The client side of this is the client library. The “Client services” will register with the Eureka server and then it provides some basic information i.e. metadata on host, port, heath indicator URL etc. Then the client services also periodically send heartbeats to Eureka. Then the Eureka server will remove services that it has not received heartbeats from them in a specified interval of time.
Eureka server Pom Dependencies
- Spring cloud makes it really easy to make your own Eureka server. Spring cloud has made it easy wrapper for these Eureka Netflix libraries. Just you have to make a regular spring boot web application and have the “@EnableEurekaServer” annotation in the application configuration class.

- Then, in your dependencies in Pom file, one of the dependencies you have to include is “spring-cloud-starter-eureka-server”. This will bring in all of the necessary Netflix libraries plus the spring cloud libraries. Please see the below dependency:
- Usually, you want to run in a production environment multiple Eureka servers simultaneously.
- Here in the above image, you can see that Eureka servers are running in different zones or different regions. Eureka is made to run multiple copies that inter-communicate. If you have a single instance of Eureka server then you will get many warnings in the log. The eureka servers are intended to communicate with each other to share the state. And this is how they provide high availability.
- Each Eureka server is usually configured with the URL and each server should know the URL of the other servers. This URL can be provided by the spring cloud Config Server. So basically, you could have the one server i.e. one jar that is deployed in multiple places. So here for one server there are multiple profiles to activate different copies of the Eureka server.
Multiple Server Configurations
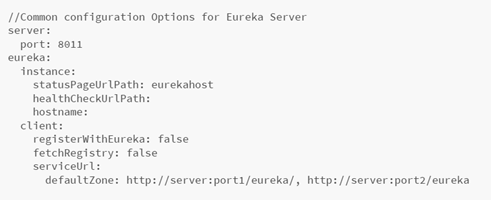
- There are some common configuration options for the Eureka server. To see the full list of options, please visit the Netflix URL GitHub site(https://github.com/Netflix/eureka/wiki/Configuring-Eureka)
Please fid the YAML file configurations as below:
- Please refer the above configuration screenshot. You can see the first line i.e. ”server port:8011”.This will control the HTTP port that this application will be exposing to the outside world.
- Now everything under the Eureka level is specific to the “client” and “instance” and the Eureka server is actually a client because it talks to other Eureka servers. So, there are also couple of things that you can set like “statusPageUrlPath”, “healthCheckUrlPath”. These configurations you can set to indicate where you want and what you want to advertise to the outside world as far as your health and info. Page. Also, the hostname you have to provide i.e. where you are actually running from.
- In the “client” section, the defaultZone in the serviceUrl indicates the server that you want this client to connect to. This can be actually comma separated list of servers. Here server is also a client because it talks to other servers.
- There are also “registerWithEureka” and “fetchRegistry” flag in the config. File. The false setting here is not the default. These flags we can use when we are running a single copy of Eureka server. These flags says that it has only one instance running. But these flags will cut down the warnings that come up with the logs when we run single copy of Eureka. Not for production use. For production, we need multiple copies of Eureka server running and we want to register each server with another sever.
Service Discovery Client
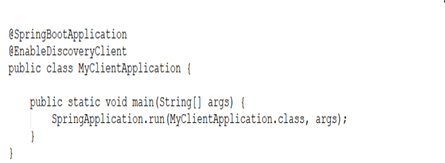
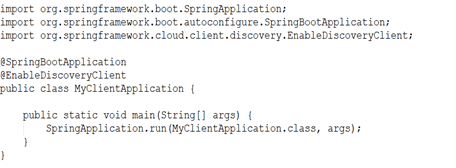
- In the client, we have to add the dependency of spring cloud Eureka server. Then in our application class, we have to enable the discovery client. So, for that Spring provides annotation called “@EnableDiscoveryClient”.
Then we need only setting that need to set in our application.properties for yaml file is the location of our Eureka Service URL (This URL what we have mentioned in the defaultZone in our Eureka server config file)
Note: We can mention multiple URLs here with comma separated.
I am going to explain here that what does this “@EnableDiscoveryClient” annotation does?
This annotation signals spring boot that to automatically register itself as a client with Eureka server. And when it makes that call, it would register the application name, host and its port. And it will use the values from the Spring Environment which we can easily override. For example, we can give our application a “spring.application.name” and it will use that. Now when we do this registration, the application becomes an instance and becomes a client. Since it becomes a client, so we can use “DiscoveryClient” to locate other services. Please take a look at the below snippet of code.
You can see the above piece of code, where I have autowired a field called “DiscoveryClient”. This is actually a part of the spring cloud Netflix libraries. It is used with Eureka server to discover other clients. In the “storeServiceUrl() method, what we are doing is that we are getting instances of the “Stores”. These stores are noting but the Eureka VIP. We will refer to it as just the application name of another service. So, this is how we would obtain information on other clients using the Discovery client.
The main thing here is that we do not have any configuration files and we do not even use spring cloud config server to obtain the url of other services. We are really looking it up dynamically from Discovery client.
What do it mean by a Zone
Eureka server is intended for multi-instance use. The Eureka server keep all of its information n memory.It does not persist anything to database or a file. So, if we shut down the Eureka servers, then all of that info goes away until the server comes back up. So, it relies on client registration and the periodic pinging to keep itself up to date. So, this is a stateful application.
So, in typical production usage, we have many eureka service instances running. And we run them in different availabilities zones. A zone is a separate data center. You can also run them in different regions. Suppose if we have an outage of entire region might be due to natural disaster, then our application would be resilient enough to use services found in the other regions.
Eureka Server vs Config Server
Config Server can be used to configure anything, but we do not want to configure service to service information in config server. We use Eureka for that. So that services register themselves. There are certain amount of configuration like the location of the Eureka server , we can put this configuration in the Config Server.
The “Config First Bootstrap” is the default in Spring cloud in terms of precedence. This means if a client uses a spring cloud config server and uses spring cloud Eureka, then it would first bootstrap itself with the configuration from the Spring cloud config server. This implies that the “spring.cloud.conig.uri” is configured in each application.
“Eureka First Bootstrap” is used for that we do not have to configure uri of the config server , we will use Eureka First Bootstrap to expose the location of the config server. Because the config server here is just another client.
So, we have to set our “spring.cloud.config.discovery.enabled=true”and“eureka.client.serviceUrl.defaultZone” should be configured in each app. So here the client is going to make two network trips before it is able to obtain the basic configuration. So, if we have the bulk of the configuration served up by the config server then we would not have used Eureka first bootstrap. But when It comes to service to service registration then we use Eureka to do that.
Demo on Eureka Service Discovery in Spring Cloud
Eureka Server Creation Steps
1. Created a normal Spring boot Maven Project and named it “demo-eureka-server” and used this value for the Artifact
2. In my Pom file, added a “Dependency Management” for identifying the spring cloud parent Pom. “Hoxton.RELEASE” is stable version that I am using now. Example:
3. In my dependencies section of Pom, added the dependency for group “org.springframework.cloud” and artifact “spring-cloud-starter-netflix-eureka-server. Example:
4. Editedmyapplication.yml file in my classpath root folder i.e. (src/main/resources). Addedbelow key / values pairs for server and port:
5. Then in mybootstrap.yml file( present in my classpath root), I have given my application name as below:
6. Then created a main application class called “DemoApplication.java”. Then used the annotation “@EnableEurekaServer” to this class. And then need to Start/run the application. Please ignore the warnings because here I am running a single instance . Example of main Class:
7. Start your DemoApplication.java and once it started successfully then need to open any browser and then hit this URL: http://localhost:8010 And then see if the server running fine.
Eureka Clients Creation Steps
1. Now, going to create a new Spring Boot web application and named it to “demo-client”. And in the Pom file, I have added the same dependency managementfor identifying the spring cloud parent Pom. And In dependencies section of Pom, added the dependency for group “org.springframework.cloud” and artifact “spring-cloud-starter-netflix-eureka-client”.
2. Then created a main application class called “MyClientApplication.java”. Then used the annotation “@EnableDiscoveryClient” to this class
Then create a Rest controller class called “NameController.java”. Added string array of names with @Value annotation. So that these names value can be read from our application.yml file. And in controller class, I have added controller method called “getNames()” with Get mapping. This method returns a string value from the “names” array with dynamically chosen index. Example:
3. Modified my application.yml file in my classpath root folder i.e. (src/main/resources). Added“person” profile and also below details:
4. Then in mybootstrap.yml file( present in my classpath root), I have given my application name as below:
5. Now, we have to create again 3 spring boot applications. So, please follow the step 1-4It is easy for you can copy the entire project that I create and then only change the below fields
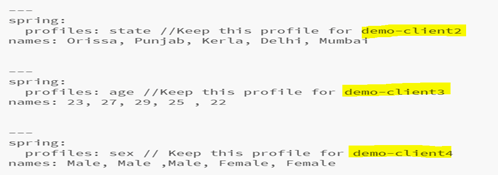
- Give application names as: “demo-client2”, “demo-client3”, “demo-client4”
- Change application name in each of your application’s bootstrap.yml file.
- You have to keep different profile for different applications. Please refer the below image. Add these profiles in respective projects:
6. Now, we have to create a new Spring boot web application called “demo-client-final”. You have to follow the same process to add required dependencies in Pom that I have already explained in step-1. And in our application’s main class, we have to add “@EnableDiscoveryClient” annotation. This already I have mentioned in step-1.
7. Now, in “application.yml” file, added the profile as “detail” and port given is “8090”
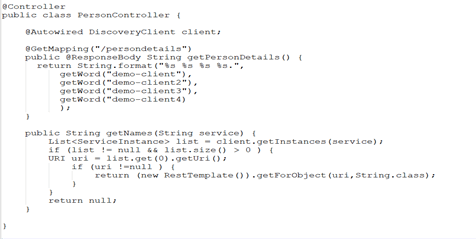
8. Then the next step is , we have to create a Rest controller class(PersonController.java)with autowired of “DiscoveryClient”. Then added controller method getPersonDetails() method with Get mapping and a normal method getNames() to serve the person details based on the names obtained from the client services. Example below:
9. Now, we will start all of ourName services(“demo-client”, “demo-client2”, “demo-client3”, “demo-client4” applications) and Person detail service(demo-client-final application). For each service, they use different port (randomly generated port), so all the individual services here can run parallel or side-by-side. Once all your application started then open your browser and access this URL(http://localhost:8090/ persondetails). You can get the complete Person details with [person_name person_state person_age person_sex]. Each time you refresh the URL, you will get a different person’s details because the person Name is randomly chosen depending upon the array index randomly generated. According to the index value, the specific name will be chosen from the person “names” array.
So, now you leant the real-time example and implication of Eureka service discovery.
Note: In the above example I explained, you can notice that in each of the client project’s application.yml file, I have configured the location of Eureka server(http://localhost:8010/eureka/).
Using Spring cloud Config Server with Eureka Service Discovery
- So, instead of that we can take advantage of the Spring cloud Config Server.Please refer to our Spring cloud Config Server blog for learning more details on the Config Server.
- To implement the Config Server here, you have to create a config Server Project and in the “application.ymal” file, you have to configure the location of your Eureka Server” Example: eureka.client.serviceUrl.defaultZone=http://localhost:/eureka/
- Then, in each of your client application’s bootstrap.yml file you have to include the config server Uri as below: spring.cloud.config.uri: http://localhost:
- Then you can verify the end-point “/Persondetails “ in browser.
Note: Instead of multiple clients, you can use one client application also, but in this case, you have to mention all of the profiles( person, state, age, sex) in your client application’s single yaml file. In my demo, I explained with single instance of Eureka server running but you can try with running multiple Eureka servers in your local. Try that yourself.
Now, I am going to explain you about the client-side load balancing in spring cloud project.
Client-side Load Balancing
Why we need client-side Load balancing?
- Client-side load balancing allows us to enjoy a level of resilience and adaptability that is often need in the Microservices architecture.
- Suppose let’s imagine a situation where our application makes a call to a server in the same region because it is fast. But what if that server is somehow unavailable. If my client-side load balancer is aware of other regions it can route the call to the other regions even though the call may be a bit slower but our application stays running. Now you understood the importance of the client-side load balancing.
Spring Cloud Netflix Ribbon
- Ribbon project is another part of Netflix family. It is a client-side load balancer and it has automatic integration with Eureka service discovery. It also has support for failure resiliency. Ribbon supports caching and batching. Caching is when we let the client avoid the remote call entirely because the it has already saved the results of a similar recent call and Batching is when several requests are grouped together into one call i.e. more efficient. Ribbon supports multiple protocols not just HTTP but also TCP, UDP etc.
- Spring cloud provides an easy to use wrapper around Ribbon.
Key Ribbon Concepts
- List of Servers: In Ribbon and in regard to any specific kind of service being called, there is a concept of list of possible Servers. This list can be obtained from a static source or from a service discovery mechanism like Eureka. Spring cloud will assume that we are using Eureka when it is present in the class path. If we have multiple kinds of services that we intended to call , then there is a separate list of servers for each kind. The servers that we are calling here are identified by their client ids (This makes sense when the apps reported themselves to Eureka as client.). There is static list of servers in the above example.
application.yaml file snippet:
In the above example, stores and products are the client ids even though each represents a list of serves that we want to call.
- Filtered List of Servers: attempts to select a favorite subset of servers to be used by the load balancer. In Ribbon, there are number of strategies that can be used. In Spring cloud , the default strategy is to is to include only servers in the same zone.
- Ping: Ping refers to the strategy that that the Ribbon client will employ when it wants to perform a health check on the target server to see if it is really up or down. There are several strategies available in Ribbon. When using Spring Cloud, the default setup is simply to delegate to Eureka to determine if the server is down or up.
- Load balancer: The Load Balancer is the actual component that choses a server from the filtered list and routs the calls to the servers in the filtered list. There are several strategies available, but they usually defer to a “Rule Component” to make the actual decision. In Spring cloud, the default load balancer is called “ZoneAwareLoadBalancer”
- Rule: The Rule is a single component i.e. responsible for making the server selection. There are several implementations available but Spring cloud’s default one is called “ZoneAvoidanceRule”
Using Ribbon with Spring Cloud
- Using Ribbon in your spring boot project is really easy. From a spring boot project, you can either switch from the boot parent to the “spring.-cloud-starter-parent”. You can better add a dependency management section. This allows you to keep whatever parent your project is currently using.
- Then we need to add a “spring-cloud-starter-ribbon” dependency for Ribbon. This will bring in all of the Spring cloud and Netflix open source software dependencies that we need to take advantage of Ribbon. So, this thing is all about the client side.
Note: There is no server-side configuration with Ribbon. There is no Ribbon server. Eureka server is going to supply us with the list of clients.
Accessing Load Balancer
- Now, let’s see how we can access the load balancer in the code and use it directly. Please see the below code snippet.
- The above code is the demonstration of low-level code. The @Autowired of the “LoadBalancerClient” gives us the Ribbon load balancer. Now, when we use it, notice that we need to supply a string to the “choose() method”. This is the client ID. This is identifying something that we get from Eureka or from static list.
- So, here we are asking to select a server for us. Within this code, we do not care how it makes the determination to choose the server. We just expect it to return a server to call. Then from there we just extract URI and then give it a call. In the choose(), that we pass “subject” is actually a client-id.
- The code to use Ribbon is 100% legitimate but it is not mist ideal it couples our code to the ribbon API. As java developers, we do not like to be coupled to any API. So, we should use a declarative approach that will avoid the completely using “Feign” and “Hystrix”. Please refer to our other blog for detail understanding of “Feign” and “Hystrix”.
Customization
- All of the defaults that I have mentioned previously can be overwritten. Basically, we defined a bean of same type in Spring cloud will defer to our bean instead of the default. Each client and servers get its own set of load balancer’s rules and server lists.
- We may need to customize these different servers differently. So, what we have to do is to create a configuration class specific to each one and then separately we use the “@RibbonClient” annotation in our main configuration class to point to each one that we have customized. Please look at the blow snippet of codes.
- All of the Ribbon clients will use the default except the specific client that we have specified.
Conclusion
Here, Client-side load balancing augments regular load balancing by allowing the client to select a server based on some criteria. Spring Cloud Ribbon is an easy-to-use implementation of client-side load balancing. Also, in this article, I explained you in detail about the Eureka Service discovery and how to implement it in your application. Please try to practice running multiple Eureka servers in your local and verify.


